Posted 06/05/2024 | 5th May, 2024
This post may contain affiliate links to things like tours, hotels, and products that I love. These links help me earn a small commission on all qualifying purchases at no additional charge to you. Thank you!
Anyone looking to backpack or travel around Guatemala will undoubtedly come across the overnight Acatenango Hike.
The Acatenengo Volcano hike is one of Central America’s most famous and popular hikes. Many companies offer tours and daily departures from Antigua. If you’re a person who loves adventure and exploring the great outdoors, then this should not be missed from your Guatemalan itinerary!
I’ve been lucky enough to complete some fantastic hikes around the world, including the Great Wall of China, and the Samaria Gorge in Crete. As soon as I saw this crazy Volcano hike in Guatemala, I knew I needed to add this one to my list!
This comprehensive guide will cover exactly what to expect from the Acatenango overnight hike, including its difficulty level, the four sections of the hike, and what to wear and pack!
What is the Overnight Acatenango Hike?
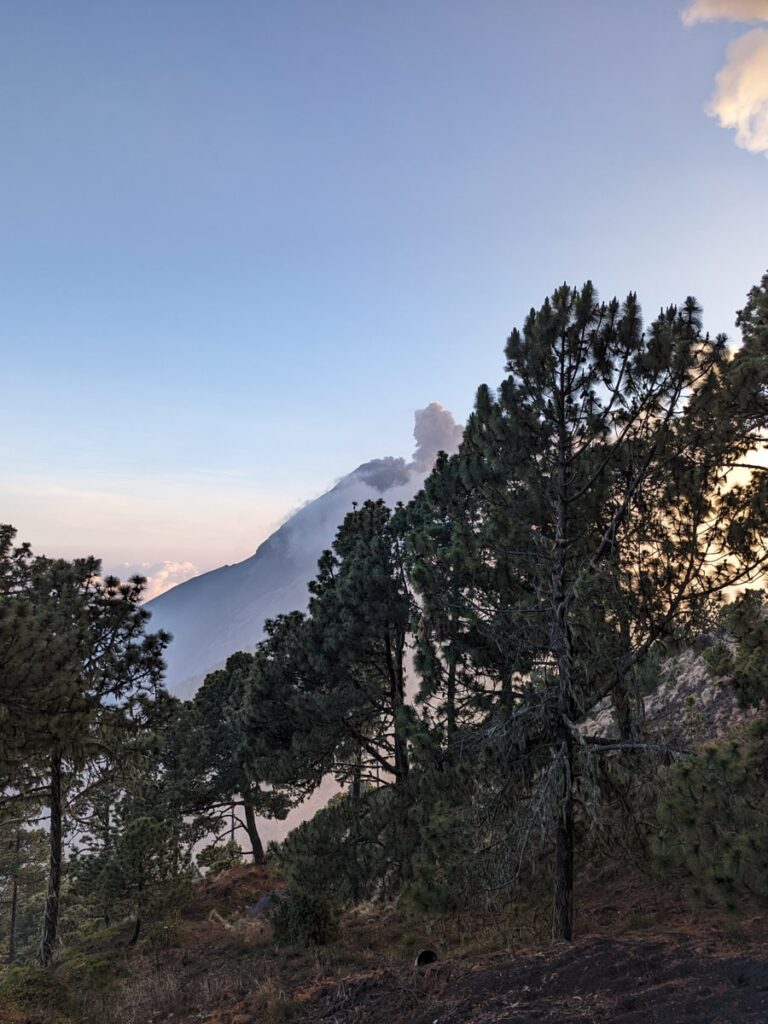
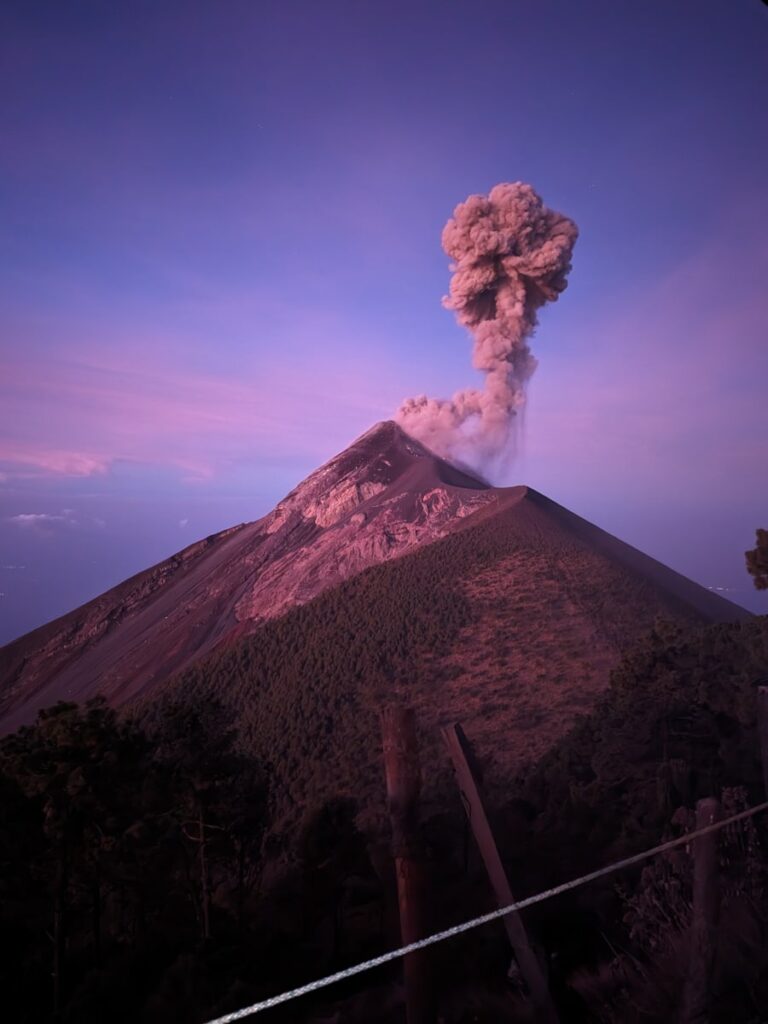
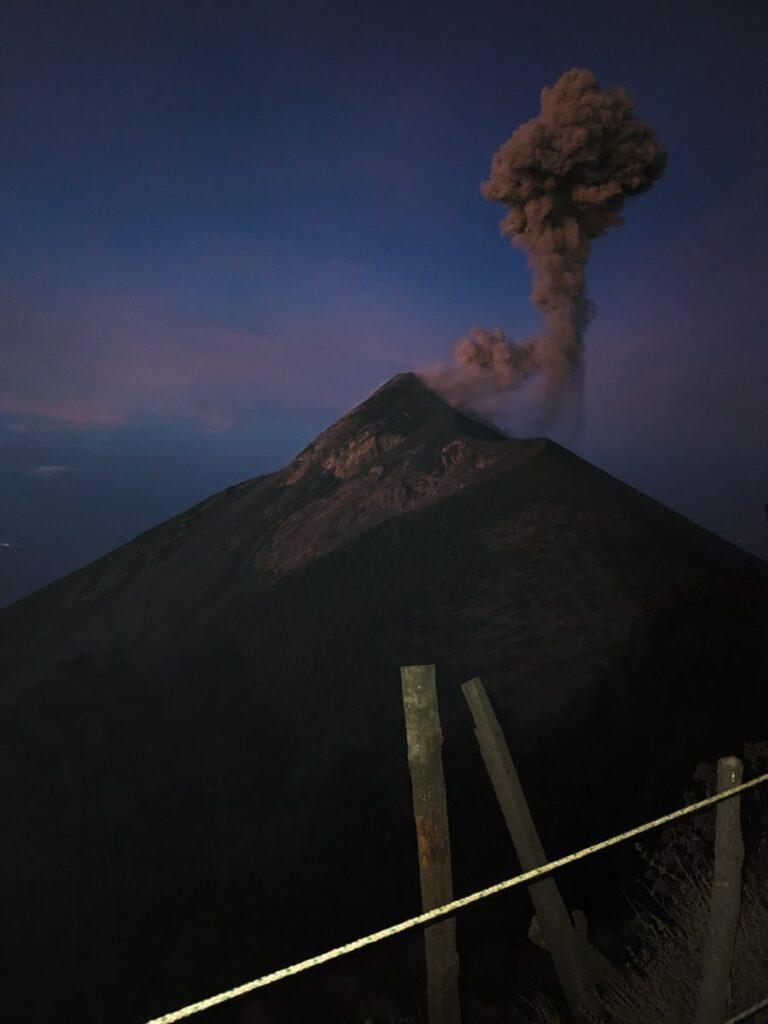
The Acatenango overnight hike is a two-day hike that allows you to see Volcano Fuego erupt throughout the night.
You will depart Antigua around 8 a.m. and begin the hike between 10 a.m. and 11 a.m.
The hike to base camp takes between 4 and 7 hours (depending on your fitness). Then, there is an optional night hike to Fuego and another optional sunrise hike to sumit Volcan Acatenango. You do not have to decide in advance; you can simply choose at the time.
On the second day, you will enjoy breakfast at base camp and start your descent around 8 am. Most groups will reach the bottom of Acatenango by 11 am.
Acatenango Hike Timeline
Your daily schedule will undoubtedly differ depending on which operator you choose for the Acatenango Hike. However, it will look something like this:
Day 1
7.00 am – Meet at your tour operator, enjoy breakfast and meet the rest of the group
8.00 am – Depart from the tour operator and head to the supply centre
9.00 am – Arrive at the supply centre and pick up supplies (food, warm clothing etc.)
10.30 am – Arrive at Acatenango, rent walking sticks and begin the accent
1.00 pm – 45-minute break for lunch
4.00 pm – Arrive at base camp
5.00 pm – Depart for Fuengo Sunset hike (optional)
8.30 pm – Arrive back at basecamp and enjoy dinner around the campfire
Day 2
3.45 am – Depart for the sunrise hike (optional)
7.00 am – Return to base camp and enjoy breakfast
7.30 am – Pack belongings ready to begin the decent
8.00 am – Begin decent
10.45 am – Reach the bottom of Acatenango and celebrate!
1.30 pm – Dropped back in Antigua
How Difficult is the Acatenango Hike?
Expressing the difficulty of the Acatenango Hike is problematic because it, of course, depends on your fitness level. I consider myself reasonably fit and very used to long walks.
However, the Acatenango hike is undoubtedly the most difficult physical challenge I have ever done.
This hike is extremely steep from the very beginning, and this, combined with the crazy altitude, makes it feel almost impossible.
It took me around five hours to reach base camp (including a thirty-minute break for lunch). But depending on your speed, it will take four to seven hours.
Hiking Acatenango as a Slow Walker
I was by far and away the most unfit and slowest walker of my group, reaching base camp around 45 minutes after everyone else.
Did this mean I got different views or missed the eruptions? Absolutely not!
The guides and porters are incredibly experienced and understand the level of fitness required to complete this hike. They will not leave you.
If you are slow (like me!), you will naturally form into another group of ‘slow walkers’ who will stick together and reach base camp together.
Unfortunately, I saw one girl have an uncomfortable conversation with a guide and decide that the hike was too challenging. She decided to turn around and not complete it. While this is sad, the guides have to ensure the whole group’s safety.

Which Company to Use
I personally used CA Travel and would totally recommend them!
Included we had the guides, four meals (which were all very big portions), warm weather clothing, a camel back and three litres of water. The accommodation was also in cabins rather than tents, and you share a cabin large enough for three people between two.
This cabin had a mattress, sleeping bag and pillow and we carried sleeping bag liners up to help keep warm during the night.
The only negative about CA Travel is that the warm winter jackets were low-quality. If you have your own, then please bring it – otherwise if bring plenty of layers to go underneath.
Some of the most popular providers for the Acatenango Hike include:
| Company | Price |
|---|---|
| CA Travelers | CTQ 630 |
| V Hiking Tours | CTQ 600 |
| OX Expeditions | CTQ 700 |
| Tropicana Tours | CTQ 660 |
| Wicho & Charlie’s | CTQ 925 |
| Old Town Outfitters | CTQ 1080 |
Hike One – The Journey to Acatenango Base Camp
Where to even start with this magical, excruciating, once-in-a-lifetime hike?
All I can say is this hike is brutal from the off. The first section is the worst, but don’t be fooled by the reviews saying the second half is ‘easy’. Absolutely nothing about this hike is easy.
However, it tests your mental endurance as much as your physical.
It’s an intense, steep incline that continues for hours and hours. There were multiple times that I thought I would quit throughout this hike, but I am so proud that I kept going! You just have to focus on putting one foot in front of the other and keep going.
You will get multiple breaks and rest stops throughout the hike.
Once you see the sign ‘fin del camino’, take a long, deep breath and pat yourself on the back—you’ve completed the most challenging section!
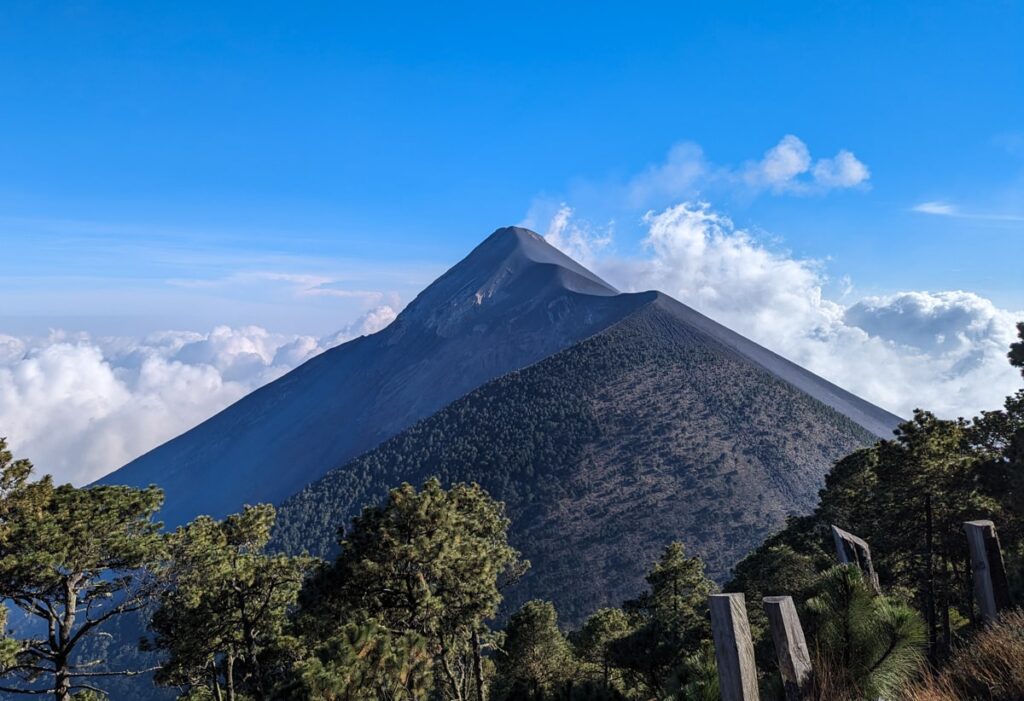
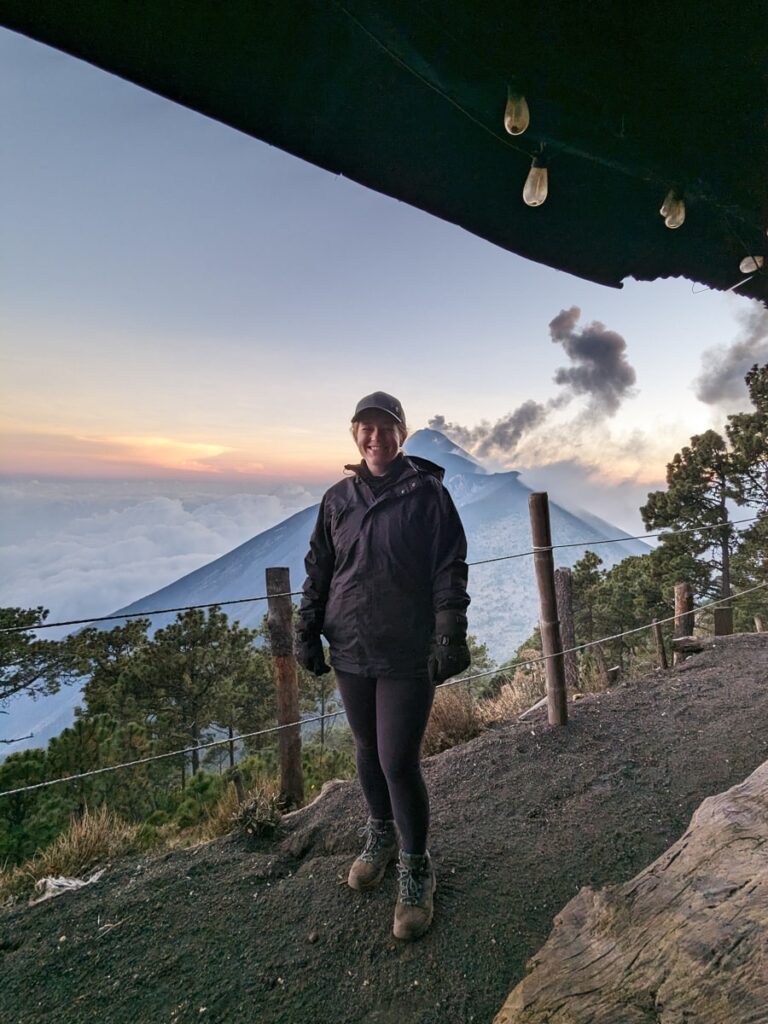
From here, reaching base camp will take around 45 minutes to an hour, and the views are amazing. Once you see Fuego, it all starts to feel worth it. There are some slight up-and-down hills on this section, but nothing like the crazy climbs you faced in the first section.
Take it slow and enjoy this final part. You will be elated when you finally see the magnificent Fuego!
Hike Two (Optional) – Fuego Sunset Hike
The great thing is that you don’t need to decide whether to do the Fuego hike before you leave. You can literally decide on whether to take this option when you reach basecamp.
There were only three of our group of twenty that didn’t complete the Fuego hike. However, from speaking with friends and reading other blogs, I think this was quite an anomaly. It costs an extra 200 Quetzales to add this extra hike, which is payable by cash.
Many of our group said that this part of the hike was harder than the main section due to the terrain and constant up and downs. Not to mention, this extra four hours of hiking is on top of a solid five hours hike.
Whether or not to do this hike is a very personal decision. The members who didn’t do the Fuego hike were happy with their decision, but those who did were equally happy.
If you choose not to hike the Feugo, you can either relax in base camp or enjoy the area. A beautiful viewpoint sits close to most of the camps and is a perfect place to watch the sunset if you don’t want to hike Fuego.
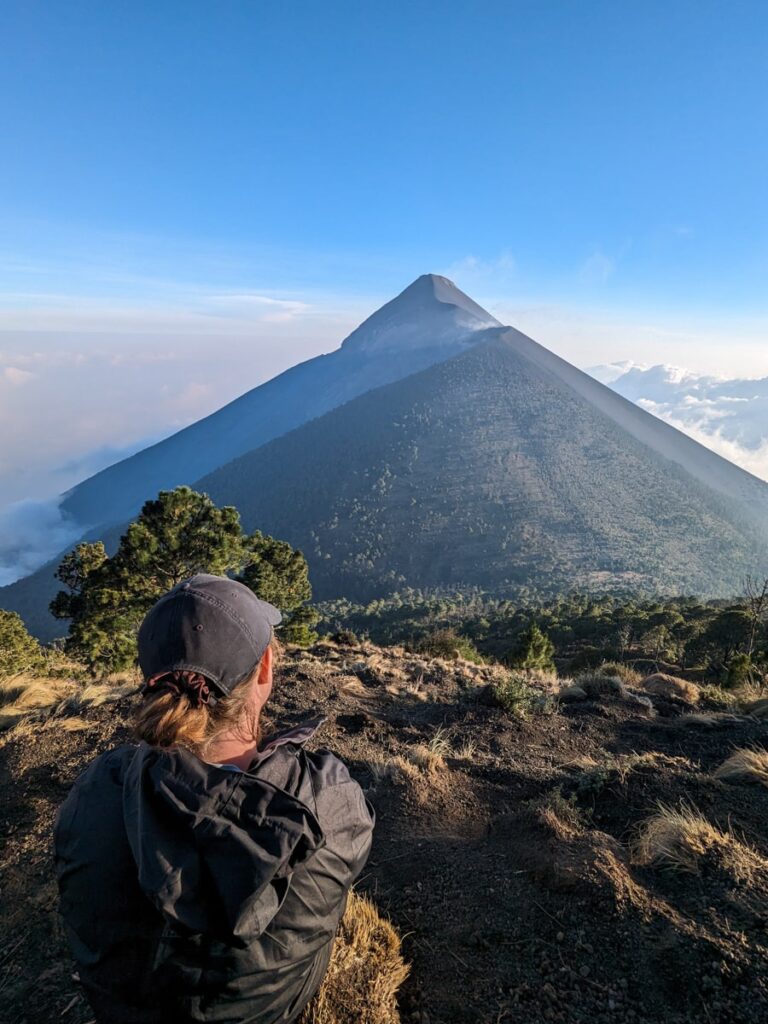
Hike Three (Optional) – Acatenango Sumit Sunrise Hike
The second of the optional hikes is the sunrise summit hike – this takes around three hours (round), and you will summit the volcano to watch the sunrise.
This trip leaves around 4 am, and around half of our group chose to do it. There is no pressure, and you can choose whether you want to do it.
Many people consider this the most difficult part of the hike – because the ground is exceptionally loose and difficult to traverse (especially in the dark). You essentially take three steps forward and then two steps back. However, it is an extremely magical place to watch the sunrise.
It is important to note that this is the part of the hike where the guides will rush you. Of course, they cannot change the sunrise time, so the whole team must reach the summit in enough time.
It’s also important to note that the sunrise view from base camp is amazing. So, if you don’t feel like another three-hour hike, you can relax at base camp and watch it from there.
Tip: Although the lava cannot be predicted, I saw some of the best just before sunrise. So, if you don’t feel like hiking, it’s still worth getting up before dawn and enjoying the magic of it.
Hike Four – To The Finish Line!
I fell over three (yes, three!) times on the way back down. Nothing serious, just a couple of scratches and a bruised ego.
Falls aside, I actually really enjoyed the hike down. There was a real sense of accomplishment, and I could have cried when I saw the finish line!
Of course, the hike down is incredibly steep, with rugged, uneven terrain. Lots of groups also seemed to set off precisely the same time, so it was pretty crowded on the trail.
I felt quite a lot of pressure to keep moving faster, so I stepped to the side multiple times to let the group pass.
Our bus picked us up again at 11 a.m. We departed base camp at 8 a.m. and reached the finish point by 10.30 a.m. This was plenty of time to go at a moderate pace and included many breaks.
What To Wear
👕Wear light clothing! Trust me, you will be sweating from the off. Shorts and a sports top will be more than sufficient, even if the weather doesn’t seem great.
🧢 Sunscreen and a cap. Many parts of the hike have no shade, so a cap and sunscreen are essential.
🥾 Hiking boots. Only one member of our group didn’t have hiking boots and instead wore trainers. Whilst this is ‘doable’, I really wouldn’t recommend it! You can hire boots if you don’t own them.
🧦Walking socks. If you have specific hiking socks, I would definitely wear them for this hike. I did, and they helped massively!
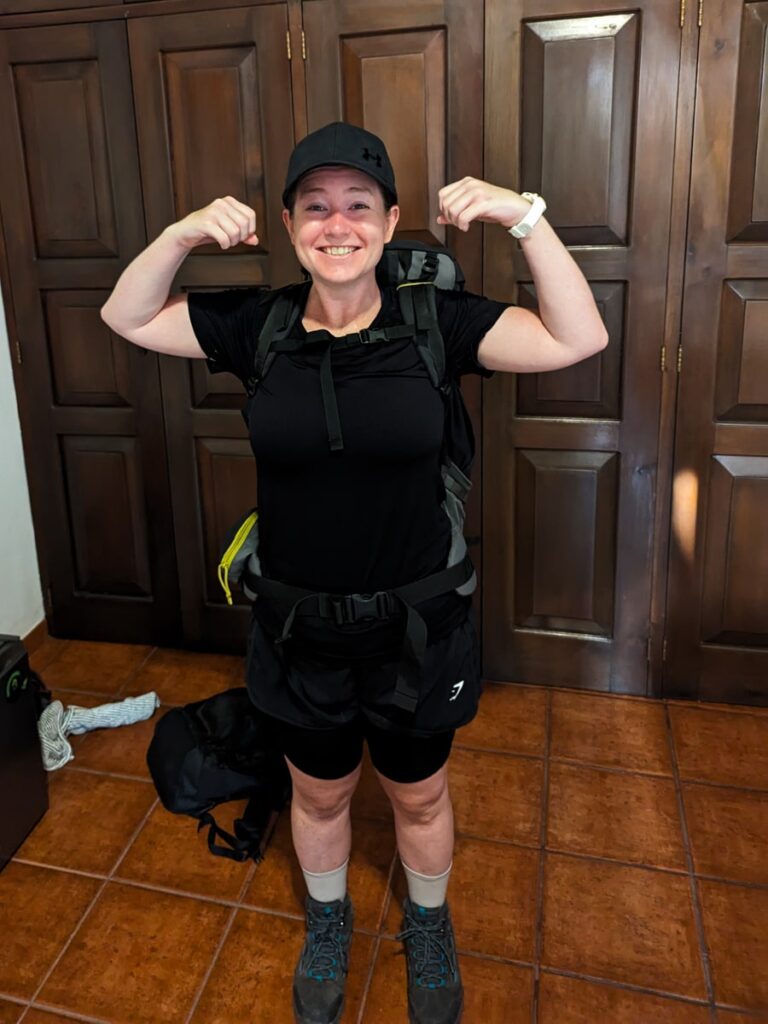
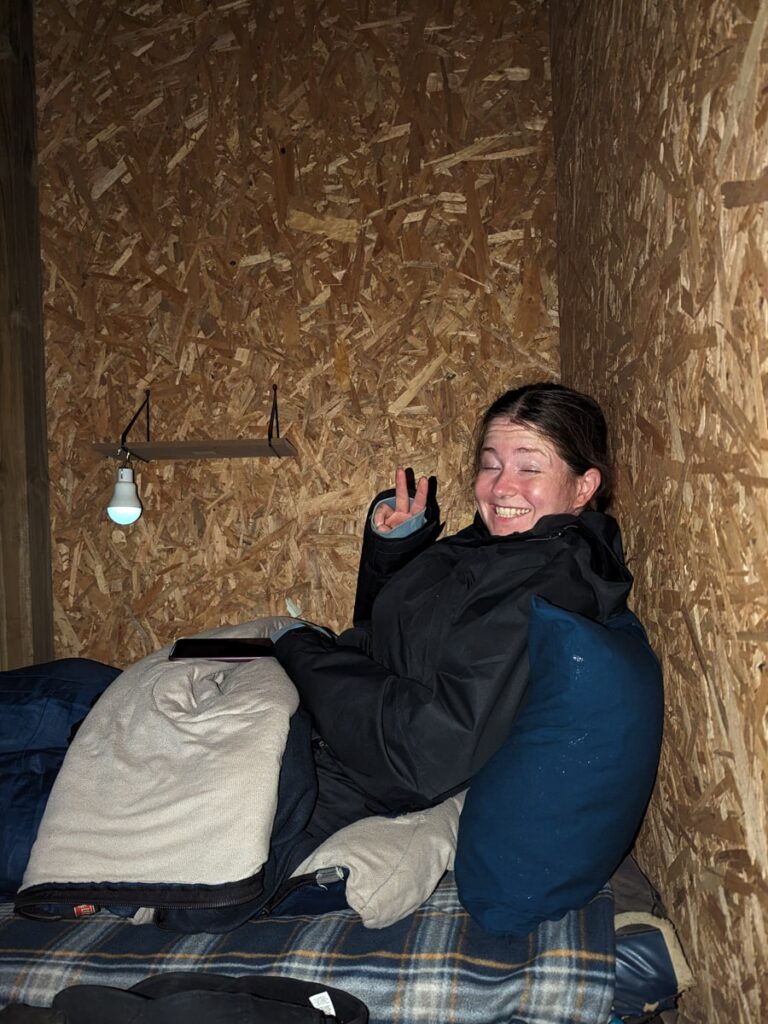
Do you want to see an epic Instagram V reality? Then look no further! Me at 6 am before the hike versus 4 am tucked up in the cabin battling some serious altitude sickness:
What to Pack
Layers, layers, layers!
It is extremely cold at base camp, and once the sun begins to set, you will feel the temperature drop immediately.
The weather was incredible on the day I did the hike, so we didn’t add any more layers until we got to base camp. But, through chatting with others, I believe many people added a layer for the final stretch as the temperature drops.
Depending on which tour operator you use, some of the following will be included in your package, but you should ensure you have the following:
- Jacket
- Jumper
- Hat or snood
- Gloves
- Extra socks for sleeping
- Long trousers
- Sleeping bag liner
- Power bank for charging phone/camera
- Snacks
- Cash (for porters/extra snacks/tips/hiring walking sticks)
- Altitude medication
Can I see Fuego without Hiking?
Now, I didn’t learn this until after I completed the hike – yes, you can!
4×4 companies take you up the volcano (you hike the final 45 minutes, which is relatively flat).
Please, there is no shame in taking the 4×4. The Acatenango hike is not easy; it is very difficult! If you want to see the magic of Fuego erupting, consider this option.
Tips for the Acatenango Hike
🥾 Hire walking poles. Trust me, they are helpful on the way up but life-savers on the way down. You can rent wooden sticks for 10 Quetzales each or professional poles for 50 Quetzales for the pair. I recommend the latter.
🎒 Hire a porter. It costs around 200 Quetzales (each way) to hire a porter to carry your bag. If you are an inexperienced overnight hiker, this is totally worth it. Your bag will almost certainly weigh over 12 kg.
🍭 Take lots of sugary, high-calorie snacks. Sweets, chocolate and nuts will keep you going!
💊 Take altitude medication. I didn’t think I would need this as I had spent a few months in Mexico before landing in Antigua, Guatemala. However, I was very, very wrong! The altitude climb here is no joke, and many members of our group were sick due to this.